
Sharpening to Perfection in Lightroom
A sometimes overlooked but vital part of you workflow should be sharpening your images – unless you’re an absolute photo ninja with the best glass around and a flawless focusing system, it’s likely your shots could benefit from a small amount of tightening up. Extra detail may be revealed to the viewer’s eye and a little punch added, really selling your shots. Do you think Pat Sharp could have rocked a mullet in the Fun House if his name was Pat Soft? No, obviously not.
Lightroom has a great sharpening tool under the DETAIL dropdown in the DEVELOP module, so familiarise yourself with it and you’ll see a subtle but marked improvement in your image output. We’ve posted on Lightroom as it’s our go-to workflow solution for batch editing, but Photoshop Camera Raw has a near-identical sharpening tool which will be intuitive to Lightroom users. Below are the 4 variables offered when sharpening. We recommend zooming your image to 100% so you can clearly see the effect your adjustments are having as you make them….

- Amount – Like it says on the tin… As you increase this slider from zero (no sharpening applied) to a maximum of 150, the amount of sharpening you apply to the image increases. Lightroom default applies a value of 25 to RAW images, but assumes Jpegs and TIFFS are pre-sharpened, so leaves this at zero. Effectively, the amount slider is your stereo’s volume dial. Be aware that the higher you go, the more noise you will introduce into your image, so try not to wake the neighbours! There’s certainly an element of personal taste here, but you can assume anything from 25 – 75 perfectly acceptable for the majority of images. See what suits for you.
- Radius – This slider dictates the spread of the sharpening effect around the edges in an image. This doesn’t mean the borders of the image, but edge details on a pixel-by-pixel basis, such as creases on a shirt, wrinkles on a face or any other myriad element of detail. The default value of 1.0 signifies that Lightroom will apply sharpening over 1 pixel around the edge, but this can be increased up to maximum of 3. The result will be visibly thicker, shadowy edges. A high radius setting will likely negatively over-emphasize the fine edges in a photo, but may help enhance the soft edges. Depending on the particular shot, you may have to experiment to find the right balance, but we’d generally recommend staying below 1.5 to retain a “natural” look to your images.
- Detail – This controls the amount of sharpening on the edges or “details” of the image. A higher value gets right into the fine details of the image, but the higher you go, the more noise you introduce, so be wary of creating glitchy looking monstrosities. we tend to stay below 40 in the majority of our work at Photography Firm.
- Masking – the final slider is extremely useful and versatile, allowing you to mask the effect of sharpening from portions of the photo, focusing the overall effect where it’s most wanted. Use this tool to suppress the overall noise introduced by both the Amount and Detail sliders around your subject. As you increase this slider, more and more of the image is masked from the sharpening effect. It works best for defining areas of high detail against those with less, so it excels for images that isolate subjects from the background. The softer and less defined the background or surrounding area, the easier Lightroom will find it to isolate from sharpening, thus bringing your main subject or detail into sharper relief.
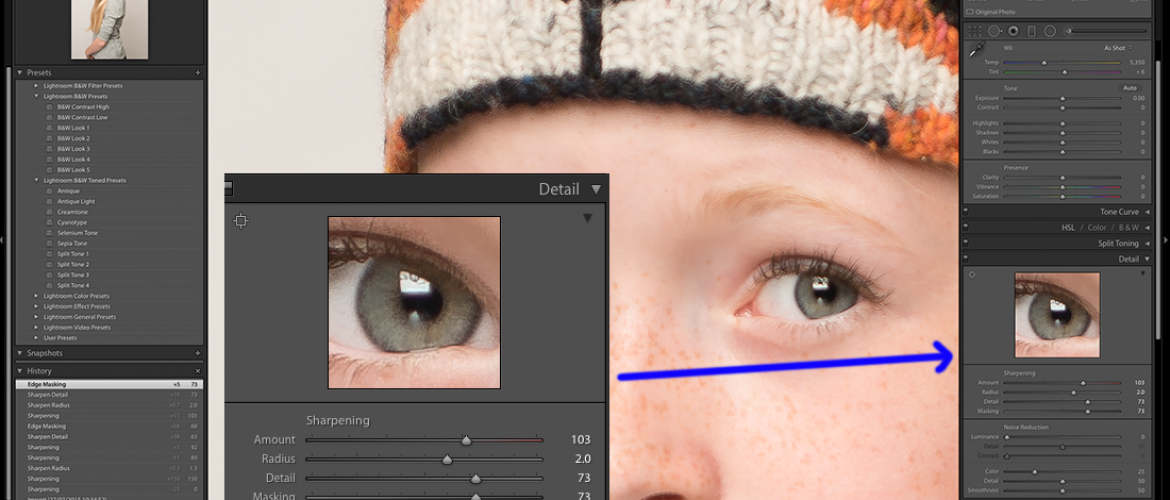
Below, you can see the same RAW file, with and without Lightroom sharpening. Our slider settings are visible as a guide to how we achieved this.


One final thing we’d recommend is using the Alt (PC) or Option (Mac) key while making your adjustments. Holding it down whilst toggling Radius, Detail and Masking sliders will switch to a polarised view which helps more clearly define the adjustments you’re making. You’ll be able to see which pixels are being affected without the distraction of all those colours and tonal shifts. Though we tend to adjust Radius and Detail by eye, we always use this method to mask our sharpening as you can fine-tune which areas are sharpened much more accurately. Give it a go.