
An introduction to Layer Masks in Photoshop
Another one of those tools of the trade you don’t know how you ever got by without are layer masks. Different photographers have different approaches and photoshop usually lets you take several roads to the same destination, but layer masks are unquestionably one of the best options for maipulating images. Their logic is fundamental and straightforward, but their potential for application is vast. What a mask lets you do is alter the transparency of any layer from total opacity to total transparency for any given pixel. The principle is that one layer stacked on another at 100% opacity will totally conceal the one below. However, a mask applied to the top layer allows you to selectively “punch through” to view the pixels of the bottom layer. This principle is hugely beneficial when comping images together or making adjustments to selected parts of an image. If layer A is stacked on top of layer B at 100% opacity, only layer A will be visible. If a layer mask is then applied to Layer A, a black brush can then be used to effctively “rub out” the pixels of layer A and reveal those of Layer B directly below.

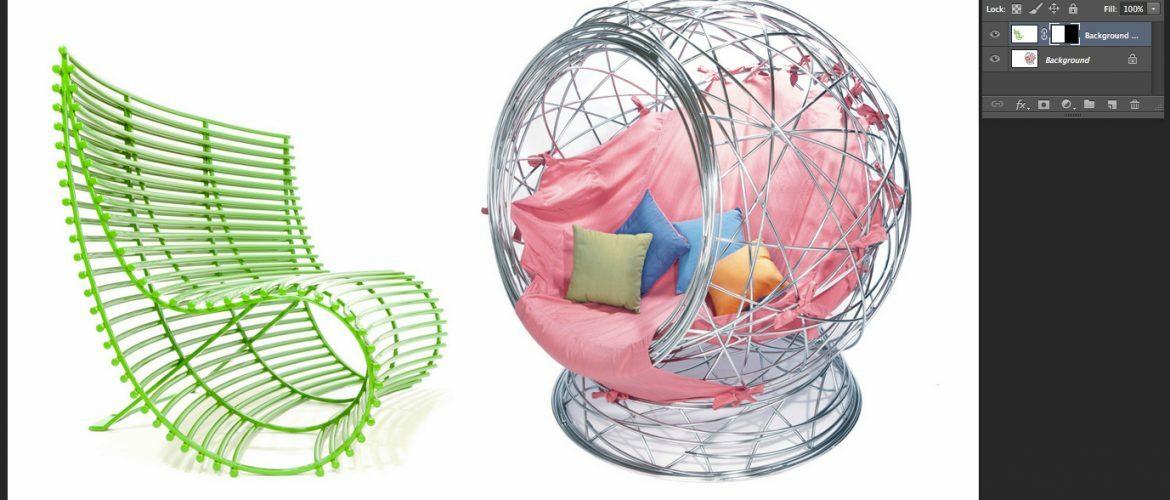
The advantage of using a layer mask as opposed to physically erasing the pixels on Layer A using the eraser tool is that layer masks are completely non-destructive. A white brush can be used to paint the pixels back in at any point. The layer retains all its pixel data, its appearance only altered by the mask. Like adjustment layers, layer masks are retained when an image is saved as a TIFF or PSD files, so they can be returned to, to be modified, duplicated or erased at any point. The beauty of masks is the precision they afford you in blending effects and layers. You need not stick with the absolute “on/off” method of pure black and white on a mask. Setting the brush to say 50% opcaity means wherever your brush strokes pass over Layer A’s mask, its pixels become 50% transparent. Layer B will visibly peek through in these places, though not fully. Further passes over the same point will further decrease Layer A’s effective opacity. Using a brush with a heavily feathered edge will give a very smooth graduation between two layers. Normal selection tools such as marquees and magic wands allow you to choose very specific areas of an image before applying a mask to those pixels. The images below illustrate how one image can be selectively comped into a second.


Once masked, you can alter variables of an image layer such as scale, perspective. etc and the mask will co-operate, shifting correspondingly. At any time, you can adjust the edge fidelity or opacity, painting in and out details. By zooming right in and using small brushes or delicate selection tools, you can mask edges incredibly precisely for convincing comping of images. Hitting X on your keyboard toggles the brush from black to white and vice-versa so painting in and out becomes quick and intuitive.


If you’re confident you no longer need to edit your mask or refine the edges of a selection, you can choose to apply it, leaving only pixel data for the white areas. This will save disk space when working with large, multi-layered comps.
So there you have it. Layer masks are an extremely effective method for painting in and out the visibility of any given layer. Like everything in Photoshop, there are many, many more tricks and tips for how to weild them, so practise and investigation will no doubt improve your workflow, but we thought we’d start by highlighting their fundamentals. They are non-destructive, retained when saved in TIFF or PSD files and can be endlessly refined with different brushes, selection tools etc. How you choose to apply them is up to you. Whether you’re swapping out a blinking face from an otherwise perfect wedding groupie, integrating a brand logo into a product shot or sticking a great big leaf into a shot of a guy walking, for no good reason, they’re your best route for seamless layer comping.