
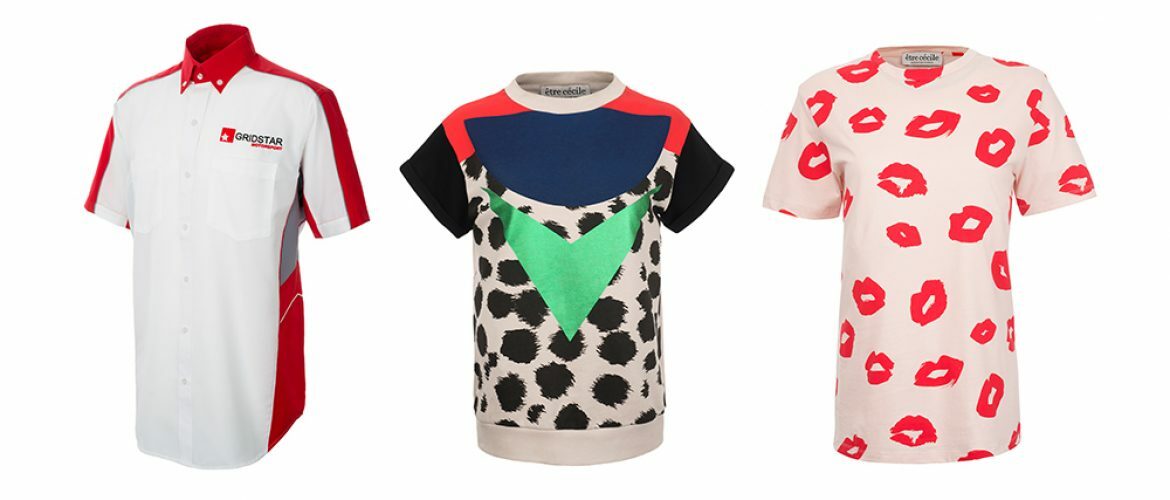
Shooting “Invisible Mannequin” clothing
Much as we enjoy working with models – the professionals can make even the most garish garment seem strangely appealing – a lot of our commissions involve shooting high quantities of clothing items on mannequins for simple, cut-out catalogue shots. Mannequins are generally well behaved, staying where you put them and rarely throwing tantrums at the size of their trailer (cupboard…), but they don’t always look great in shots, so clients frequently opt for “invisible mannequin” shots which display the shape and form of their products without the distraction of a model or “non-sentient artificial humanoid accouterment facilitation device” (or “mannequin” if you prefer). Here we’ll show you the relatively simple setup we use to get the best results straight out of camera. When you have hundreds of pieces to shoot to a tight deadline, the more you can do in-camera, the less time you’ll spend going quietly insane in front of Photoshop or Lightroom later.


We use ghost mannequins now. They have a hollow construction and dropping neckline which saves a lot of time post-processing. With a traditional mannequin with protruding neck, the inside back of the garment’s neckline (where the label usually sits) was not visible. It was therefore necessary to turn it inside out, reverse it, shoot again and then comp that portion back into the original image in place of the mannequin’s neck, adding a little shadow for convincing depth…..sounds like a lot of work doesn’t it?
Here are our top ten tips for great invisible mannequin photography:
1. Clear a good space to work in and have your items lined up and ready to be shot. They may need ironing or steaming first. By working methodically from a clothes rail, shooting then stowing each item, you’ll know you’ve covered everything and avoid the stress caused by a messy environment. It’s also super-satisfying to see the items on the rail diminishing…until you remember there’s a whole other box to unpack…
2. Shoot from a tripod at a fixed focal length with locked focus. Make sure your camera is straight on, at a level height to your mannequin to avoid distortion. Your shots will be consistent across the range of clothing and by eliminating variables such as angle and framing, batch processing your images will be a doddle.
3. READ YOUR BRIEF! If your client wants reverse shots of the garments, make sure you get them first time around! We use a simple rotating stand we built with a bit of wood and some bearings so we can quickly spin the mannequin for reverse shots hundreds of times and know that our focus is still at exactly the right distance and our garments remain perfectly positioned in our frame.
4. Light your subjects evenly with big, soft sources, as you want to avoid unflattering shadows forming behind creases or folds on garments. We use two large softboxes placed at roughly 45 degrees to our mannequin. One softbox is slightly higher to fill in the interior of the garment around the neckline.

5. Light your backdrop independently from your subject. We use two strobes with reflectors and inward-facing barn doors to stop light spilling directly onto our subject. Retain enough distance between subject and backdrop that reflected light from the backdrop does not spill around the edges of your subject and impact detail.
6. Over-expose your backdrop by roughly a stop compared to your subject. If your lightmeter tells you your subject is correctly exposed at F8, your white backdrop should give you a lightmeter reading of F11. This retains a pure white backdrop which makes cutting out your subject straightforward.


7. Use a colour checker or grey card so you can be sure your colours are true. Where products such as clothing are concerned, your clients will be in hot water (and so will you!) if customers purchase items which don’t match what they’ve seen online or in a catalogue.
8. Try to get the items styled properly in-camera. We sometimes pack out certain areas with tissue, clip or tape the garment to achieve the flattering shape the client wants to see or remove an unsightly hanging fold in the material. If you have lots to shoot and a particular item simply won’t behave, decide whether it’s quicker to tweak it in photoshop then get frustrated trying to style it precisely on your mannequin.

9. Find a friend who loves ironing and pick a good spotify playlist, you may have a long way to go….
10. No red wine in the studio!!


That’s a great little article and thank you so much for sharing, as I’ve often wondered how clothing catalogues achieved the invisible mannequin look. I recall struggling to photograph some high visibility clothing for a welding company some years back and really wished I’d had known about ghost mannequins back then, it would have saved me hours in post and may well have encouraged me to take more clothing photos!
Thanks again for sharing 🙂
I really need and want to do this type of photography, please help me or
R tell me how.
Hi Gloria. It does take quite a bit of practice and experience! Hopefully our post has given you some ideas, but if you have any specific questions please do post them here and we’ll do our best to help.
Really helpful article. I’m going to test it out on my house but I honestly think that the best results would happen when using the tips.
I really enjoyed this awesome photo mannequin technique
Always I wondered how the clothing catalogs comes with the invisible mannequin. Most of the time we see clothing brands, branding their cloths with the models. But you can’t get 1000 models for 1000 samples. In that case mannequin shoot is the best idea. You shared a hell of information’s. I liked it. Keep up.