
Photographers Tips – Bouncing on-camera flash for great results
In our studio we have the luxury of all the softboxes, umbrellas, snoots and light modifiers you could shake a stick at (NO shaking sticks around our equipment please!), but on location you don’t always have these tools of the trade, either by choice or design. However, learn to use your speedlite effectively and you’ll find you can achieve some great results without lugging around all that expensive, energy-sapping equipment (both yours and the national grid’s!). Whilst you may not be afforded as much flexibility or creativity as with a host of strobes, it can be liberating to shoot with nothing more than camera and flash and once you master it, you’ll be able to deliver professional results whilst the next show-off is still carefully unloading his £2000 Profoto lights from the car.
The basic principles of light dictate that a small, hard source of light such as an on-camera speedlite will give off harsh results when directed at a subject. The light’s angles of approach are limited so it does not envelop the subject so much as hit them bang-on, leading to strong shadows, hot spots and a generally flat, non-pleasing look. This is why we use umbrellas and softboxes in the studio; they greatly diffuse and disperse those angles of approaching light, spreading it out so it envelops the subject evenly. We can witness a similar effect on a cloudy day. Rather than direct light from what’s effectively a pinpoint source (ok, the sun’s big, but it’s also more than a stone’s throw away!), clouds break that up, softening and redistributing the angles it approaches us from. On an overcast day you’ll therefore see less harsh shadows, contrasty scenes and squinting subjects, compared to a cloudless summer scorcher. When brides and grooms pray for blazing sunshine for their big days, their photographers are secretly hoping for a few clouds to make their jobs easier…. the meanies!
To achieve more pleasing results with your speedlite, you’ll want to angle the head so as to bounce the light off a much bigger surface before it connects with your subject. This achieves a similar result to the large surface area of a softbox or those helpful clouds. Most speedlites worth a look will allow you to swivel the head in several directions, so it’s possible to bounce their light off of ceilings, side walls, or, by turning the camera upside-down, even the floor. The below diagrams illustrate the principles at work (remember, we’re photographers not artists!)


When using a speedlite, it’s good to balance the flash exposure with some ambient light so try shooting in aperture or manual modes and dialling in some of that ambient, otherwise your results may lack the colours and details of your subject’s surroundings and leave them looking like a rabbit in headlights. You can shoot in ETTL or MANUAL exposure flash modes but you may find ETTL underexposes slightly due to the extra distance the flash travels when bounced, so try adjusting the flash exposure compensation accordingly.
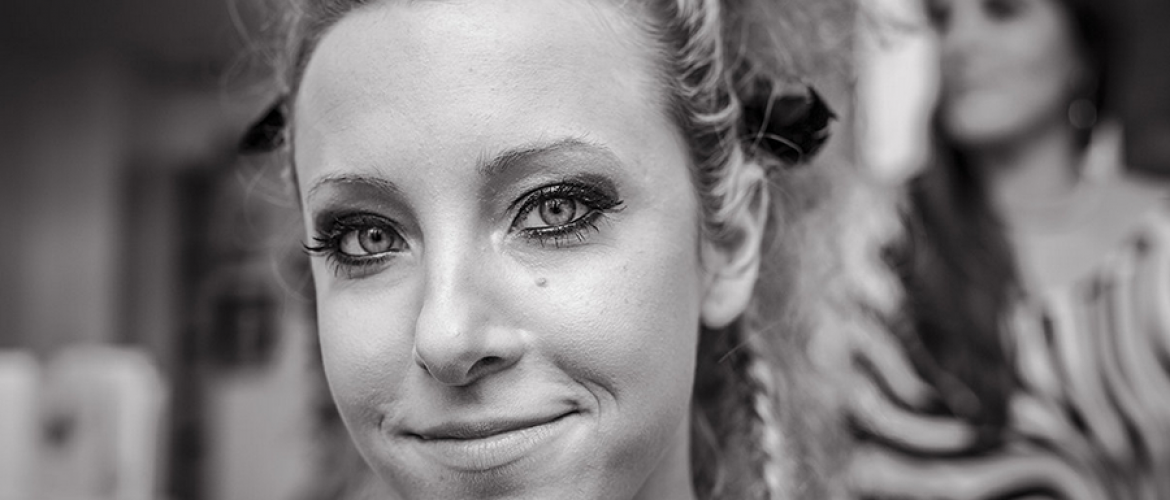
The images below of our intern Joe show the different results you can achieve with an on-camera speedlite. As you can see, direct flash is very unflattering. Shadow under the chin is harsh (and will be cast strongly behind the subject if they are close to a wall). There are hot spots around the nose and forehead from directly reflected light and the image is contrasty in places, yet overall flat. The effect on skin complexion is very unflattering, appearing pallid and shiny – Joe’s moving to Barcelona soon and this shot would suggest he’s going to buuuuurrrn!
By bouncing that light off the ceiling above, the results are much better. The light has spread out and wrapped around Joe, creating a pleasing tonal range which better defines his three dimensionality, filling in those shadows and flattering his youthful complexion. He might just get away with life in Spain after all.
In the third shot, we’ve once more bounced off the ceiling, but extended the bounce/fill card many speedlites include on the head. This little piece of white card bounces a small amount of light directly at the subject when the head is pointed upwards. The results are pleasingly similar, but there’s just a little more punch from direct reflection (although also a little shadow) and crucially, the fill card provides catchlights in the eyes of your subjects.
Our final shot shows the effect of angling the head to the side and bouncing from a nearby wall. Light is once again more diffuse and flattering than when shone directly, but there is a clear predominance of light on one side of the subject.


So there you have it – the quality of light is greatly dictated by its direction and the size of the source, so try bouncing flash for nice diffuse results, whether your subjects are products or people. This technique really comes into its own on location and is indispensible for most event, portrait and wedding photographers. It’s worth mentioning that for easy and accurate colour reproduction, a white or off-white wall or ceiling works best, but if you find yourself shooting in an all-black S&M dungeon (it’s probably time to consider shooting weddings!), a large piece of white card or well-positioned reflector will suffice. Give bouncing a go, you’ll never look back.
The following shots were all achieved with on-camera speedlite flash only…


Very informative!
Great article, thanks for the tips.